Saturday, May 28, 2011

Anime North Has Stupid Policies

Greetings, readers.

I just got back from AnimeNorth 2011, and boy am I upset. I dressed up as a ninja and I had two plastic swords with rounded edges (you couldn't cut anything with it). I was admitted into the Artist's Alley, yet wasn't allowed into the Dealer's Room, where all the merchandise is. This is the conversation:

Guy: "Sorry, we can't allow you in; you haven't gotten your weapon checked."
Me: "No one told me I had to get this checked. They let me in to Artist's Alley, why can't I go into this area?"
Guy: "You could poke someone's eye out with that."
Me: "Are you kidding me? You couldn't poke someone's eye out with this if you tried for a week! This is really lame."
Guy: "Yea, sorry, it's our policy."

I had to trek all the way across the building to the "weapons check area" where I had to sign 2 waivers, get my picture taken with the "dangerous weapons", and get them inspected by what they called the "Weapons Master"-----> fat, middle-aged dweeb. Guess what they did to ensure my "dangerous weapons" wouldn't poke someone's eye out. Give up? They put twist-ties on the handles. TWIST TIES! I couldn't believe it, especially since in the dealer's room people had booths selling real metal weapons! Real swords, throwing knives, one guy was selling girkha knives (curved knives used in WWI). I didn't see a single twist tie anywhere in those booths. That incident completely ruined my excursion and it enlightened me to how stupid some people can be.

Here's a picture of what a girkha knife looks like:


Here's what my 5 dollar plastic sword from Party Packagers looks like (try and find the magical twist tie):


Remember this dear readers, twist ties are your best form of protection.... according to the AnimeNorth Convention People.

Thursday, May 26, 2011

Blog Post#15-Tech Class Photoshoot

Greetings, readers!

In CyberArts Tech we've learned about different shutter speeds and apertures. For those of you who don't know what those are, shutter speeds are the amounts of time a camera's shutter is open and an apertures is a hole or opening in a camera that allows light to pass through. Our assignment was to go outside and experiment with different shutter speeds and apertures. Below are some examples of photos we took; they were meant to have obvious mistakes in order for us to learn which shutter speeds and apertures work best depending on the shots we want. My group was me and NightAngel.


This is shot that was over-exposed; that means too much light reached the film and any bright parts of the photo lost detail. Our subject, fellow CyberArtist I AM AWESOME's shirt is too bright and detail is lost. We made the f-stop too low; our next attempt shall be with higher f-stops. NightAngel took this picture in order to capture I AM AWESOME's love for dandelions.


This next shot was underexposed; not enough light reached the film so shadows became too dark and photo lost detail. The f-stop we used was too low. Also, the depth of field is off since the fence that was in the foreground became a transparent blur. We suspect the shutter speed was too fast and the camera was focused on the background too much. I don't know which of us took this shot.


These are our best depth-of-field shots. The transparent fence was on purpose this time; we wanted to focus more on the Mighty Machine digging up our football field. NightAngel took that one. The dandelion picture I took; I wanted to focus on the yellow flowers (do you call them flowers if they are weeds also?) and have the green grass a bit more blurry.

Blog Post #14-Edward Burtynsky

Greetings readers,

Have any of you heard of Edward Burtynsky? If not, he's a Canadian photographer who has become very well-known for his photographs of industrial landscapes. He was born on February 22 in 1955 in St. Catharines, Ontario. He has a BAA in photography and a diploma in Graphic Arts. Burtynsky's most famous photos show mining sites, mine tailings, quarries, factories, large industrial plants, etc. He captures them in such a way that they look almost natural and not man-made. He takes his photos with a large-format camera and 4x5 inch film, creating large finished products. In order to capture suitable shots, Burtynsky goes up on elevated platforms, the natural landscape, and sometimes on helicopters. His works have been exhibited in many galleries and museums across Canada and around the world. Below are some examples of his work:


Processing plant in China


Three Gorges Dam Project in China


Mine Tailing in Sudbury, Ontario

In 2006 a documentary was made about Edward Burtynsky called Manufactured Landscapes. The documentary focused on Burtynsky's many photograph series, his processes, and his inspirations for his photoraphs. It also showed the places he's traveled to in order to get good shots. I was enlightened as to the amount of destruction mankind has caused the environment in order to obtain resources that most of us take for granted. Seeing mine tailings that turned rivers bright orange or green and the humongous piles of rubber tires really opened my eyes. I think it's a really good thing that Burtynsky takes photos of places around the world that have been ravaged by man and abandoned, like the marble quarries in Italy that he photographed. Giant holes blasted into the mountains, and most of them were just abandoned. Oil spills were photographed as well, and just thinking of all the sea life that had to live with black gunk floating around makes me queasy. Thank you, Edward Burtynsky for inspiring us to help the environment!


Tuesday, May 3, 2011

Blog #13- Shazaam Project

Greetings, readers!

A project called Shazaam has just finished in CyberArts; it combines CyberArts with the force of Lakeshore Arts and Humber College. The project was to design propaganda posters advertising how great Lakeshore Collegiate Institute is since the school gets a pretty bad rap. Two guys came from Humber College to help us out with Photoshop and develop our poster ideas. We discussed topics like "family", "art" and "future" and made quotes with regards to those topics in order to finalize our ideas for our posters. I went with the theme "future" and my quote was "Lakeshore C.I.; our future is creative". The idea behind that is many years down the road in the far-off future, Lakeshore Collegiate will be the only school that survives. I didn't want to do a photo collage so I decided to just draw the whole poster in Photoshop. Before I began, I researched what old 50s posters of the future looked like so I would have some reference and inspiration. I wanted to make the lines smooth and very graphic; I tried to not have anything pixelated. Below is what the final product looks like:


In the background there's a futuristic city, depicting what the future might look like. The future Lakeshore Collegiate does not look like its present counterpart. I wanted the poster to be completely cool and futuristic; not the rectangular building it is now. If I was to rebuild Lakeshore C.I, I would try to make it look like that. To clear up any apocalyptic worries, I am not prophesying Lakeshore is going to be destroyed in the year 3000; I just chose that as a random date since it sounded cool. The school was really built in 1950; back then it was called New Toronto Secondary School. The hardest part of the poster was drawing the phoenix on the school since the feathers and the tail have to be flowing and feathery. At first the phoenix looked like a duck because I had made the wings look too lumpy and the head too duck-like.

Tuesday, April 19, 2011

CyberArts Assignment: Monster Chair


Greetings, readers,

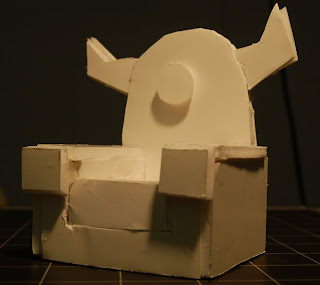
Just a few days ago in CyberArts, we designed our own chairs and built miniature models out of foam core. The chairs were supposed to represent ourselves in some way so I decided to make mine a monster chair (I really like monsters). If It was a real chair, it would be available in lots of bright colours since I like big bright colours. Below is part of the concept drawings I did to see how big the chair would be in real life and the different parts of it (so I would know how to make it with foam core). At first I wanted to do an eyeball chair or a squiggly alien chair but those would be hard to make out of foam core. For the concept drawings, we had to make grid drawings(orthographic) to show different sides of the chair (top, front, and side) and then a more detailed drawing (isometric) that could be three quarter view or otherwise.


When making the chair, I at first thought to use white tape on the outside but my friend suggested it would look messy if there was too much. I decided to use the glue gun since it can fit into cracks and dries very easily. I did end up using masking tape, but only a little bit on the inside of the chair where it would not show. The hardest part of making the chair was making the horns on the side of the monster chair's "head". I had to redo some of the pieces once or twice because I wasn't very good at making the pieces approximately the same size. Below are pictures of the monster chair from different angles.


When sitting in the chair, your feet would normally go on the floor unless you are a midget. The eye in the centre is a headrest for your head. I decided to make the chair pretty much an armchair that's been morphed with a monster so it would be functional still. I consider it a work of art because even though the monster chair looks like it is eating your face, it is still a comfortable chair.

Monday, April 18, 2011

Blog Post #12- Wacom Tablets

Hey blog readers!


Have any of you ever wanted to draw on the computer but had to draw with your computer mouse and the drawing ended up yucky? Lots of you? Oh no! Well, here's something that will completely change the way you draw on the computer! Drawing tablets! As you can see below, these are pressure-sensitive, flat-surfaced tablets that enable you to draw digital pictures just like you were drawing on paper. These tablets can cost as cheap as about $80.00 to about as high as $400.00. It all depends on how wide the tablets are and how good their quality is.


A good tablet type I like to use is the Wacom tablet(I'm not entirely sure what otehr types there are; this is the only one I know about). The Wacom tablet is smooth and has just the right amount of sensitivity. Plus, it's handy to carry around because it can be easily plugged into any computer's USB drive. If you get too large a tablet, it's best to keep that at home and maybe get a smaller one if you travel a lot.

Blog Post #11- Will It Blend

Greetings, readers,

Have any of you ever heard of the Blendtec blender? No? Well, the Blendtec blender is the best blender in the history of blenders! Why? Because it can blend anything! Tom Dickson, blender extraordinaire, stars in the Blendtec videos called Will It Blend. The videos show the Tom Dickson guy blending anything and everything, ranging from laser pointers to iPads-even silly putty! The hilarious thing is that during the videos, the cameraman will zoom out and it'll show the Tom Dickson guy with some big stupid grin on his face, as if he's saying "Isn't this fun? I'm blending a $499 - $829 iPad! Yay!"


The Blendtec company was really smart to make these videos because they make their blender seem like some unstoppable appliance. It's interesting to see how companies will try to get people to buy more of their products. This way is better than a TV commercial because if it's a TV commercial, people will just mute it or switch the channel. If it's an Internet video that advertises the product in an interesting way, then people will be more interested. If you are interested in seeing some old guy blend a bunch of stuff, here's a link to the Blendtec website! click here for blending bliss.

Blog Post #10- Graffiti Tutorial

Greetings,

Are you looking to do some graffiti but don't want to get arrested? Then follow this link click here for part 1and watch this awesome tutorial! This link goes to part 2 of the TWOtorial (:D click here 4 part 2. The tutorial is done by some British guy who works for Photoshop Talent (I don't know if this is a real company or just that guy). The tutorial is all about how to create graffiti on Photoshop and then place it on a picture of a wall to make it look real. I found this tutorial extremely useful because one of the tech assignments I'm doing at the moment is on graffiti.
The thing I like about this tutorial is that it's very step-by-step. The guy whose narrating it makes sure the viewer understands what he's talking about (although he's got a heavy British accent so sometimes it's just difficult to even comprehend what words he's saying). I've seen other tutorials where the person just whips through it and isn't very clear with what buttons to press and which icons to click on. Hope you enjoy yourselves!

Blog Post #9- Cool Sidewalk Art

Greetings,

I've found an amazing Internet page that shows a whole smorgasbord of 3D sidewalk chalk works. They were all done by artist Kurt Wenner. The things I love best about them is how detailed they are and how the works seem so life-like. When looking at these pictures for the first time, I thought they were all paintings, not chalk. Kurt Wenner is a master street painter who creates the feeling of amamorphism(making his chalk art seem to rise and fall from the ground) by drawing mythical monsters from literature and theatre as well as historical pieces. Here is one of his pieces, called The Last Judgement. The Pope signed this mural!

The image below is another of my favourites (and a whole lot of other people's too because everyone likes money :P
I like how the vault opening looks 3D, even though, if you look closely, you can see the wall underneath. I like how Kurt Wenner uses the chalk to blend the colours together; that way viewers can't see the hard edges of the shadows. Kurt Wenner put a lot of detail into the picture and it's easy to see it took him quite a lot of time to do it.

Blog Post #8- Sean Galloway

Greetings readers,

Have any of you heard of the Tv show Spectacular Spiderman? No? Well, this post tells you all about the designer of Spectacular Spiderman-Sean Galloway! He is an artist who hails from Los Angeles, California. If you want to check out his gallery, go to his Deviantart profile at the following linkclick here. Sean Galloway is also working with the Schoolism online classes program so you can also check that out.


I like Sean Galloway's style because it's simple and really flows. Things like the edges of people's clothing and limbs all flow down to the next line. Another thing I liked about his artwork is the simple colours. They aren't flat, and they add a lot of detail to the drawings.

Since I also love drawing cartoons of super heroes, this style is really useful because it's not too difficult for the average high school student to draw when compared to the usual Marvel superheroes. Sean Galloway also likes drawing other superheroes and characters for fun so here are a few.

Sunday, April 17, 2011

Blog Post #7- Bobby Chiu


Bobby Chiu is a really good digital painter who works for Imaginism Studios. He's done a lot of digital drawings on dragons and monsters. He also teaches online digital painting at Schoolism.com. I like his artwork because I like drawing monsters and things like that too. It's neat to see the creative critters that Bobby Chiu thinks of, and how the dragons he draws are all different yet you can see some similarities in the way he draws them.

My favourites are these three photos that I uploaded, because I thought they were all really well done and they made me laugh. I like how the big red dragon is chasing the fuzzy white critter dressed up as a carrot. It was funny to see all these little creatures ganging up on a giant dragon that could probably knock them away easily. The blue dragon spotting the rubber dragon floatie was funny too, because it made me think of all the animals in the world who see people wearing clothes or something with their animal faces on them (for example, a raccoon seeing someone wearing a woolen raccoon hat) and probably wondering what is going on.

I recommend this link to all who want to see the rest of Bobby Chiu's works
http://www.imaginismstudios.com/our-art

By the way, Imaginism Studios did the art for Alice in Wonderland! Check out their website!

Tuesday, April 12, 2011

Blog Post #6: Don Martin

Greetings, readers,

Have you heard of Mad Magazine? It's a crazy magazine that makes fun of a lotta stuff! Heard of Don Martin? No??!!! He was an artist for Mad Magazine, and a very big inspiration for me. He died in 2000, but worked for Mad Magazine from 1956 to 1988. I love his cartoony style and the way he draws feet (if you ever see someone with feet like how Don Martin draws them, get them to a doctor quick!). A very interesting thing he did with his drawings was give them really big chins. Despite the big chins and floppy feet he was very good at caricatures of celebrities and famous works of art. Check out the Mona Lisa and American Gothic! Leonardo da Vinci must be spinning in his grave.


I like how he makes any sound effects really big and bright; they make the comic/cartoon a lot more zany and unrealistic. I've tried to incorporate some of his habits into my own drawings since what he does is very funny.

Blog Post #5: Cinematographer

Greetings,

A very interesting cinematographer I found out about recently is a foreign film director by the name of Tonino Valerii. Tonino Valerii has directed movies like My Name is Nobody, A Reason to Live, A Reason to Die, and other old movies from the 60s. My Name is Nobody, released in 1973, is a spaghetti western about a famous gunslinger who wants to retire but can't because of his biggest fan Nobody. The thing I like best about his movie My Name Is Nobody, is the movement of the background characters. Whenever the main characters are talking or something, the background is lively and very realistic (the extras aren't wandering around, unsure of what to do and where to go). Not only are the background characters spot on, but the camera angles are very interesting; there are plenty of closeups and strange angles used.


Below is the bar scene from My Name Is Nobody; concentrate not only on the background characters but also the different camera angles too. Even though it is an older movie, I still find it funny and interesting.

Monday, April 11, 2011

Blog Post #4: ZBrush


Greetings, readers,

A couple weeks ago I started a class learning the 3D modelling software ZBrush (either pronounced zed-brush or zee-brush). Surprisingly, this software is used in a variety of movies like Avatar, Watchmen, and Pirates of the Caribbean. The main reason ZBrush is so popular is because it's like creating models with digital clay (if you do not have a tablet, you won't be able to experience the full controls and attributes of the program with a regular mouse). If you want to, you can also do 2D models but they do not have as many features and capabilities.


When you open the program, a sphere is already selected for you to alter. If you don't want to use the sphere, click on the squiggly yellow shape at the top right hand corner to select a different shape. Remember this, if you select a new shape, remember to click "Make Polymesh 3D" in the top right hand corner or else you can't model on the shape. The images are all things you can do on ZBrush(I haven't gotten that good yet- stick figures are all I can manage right now).

Wednesday, March 30, 2011

Chair Design In Sketchup- 20 Minutes

Hello everyone,

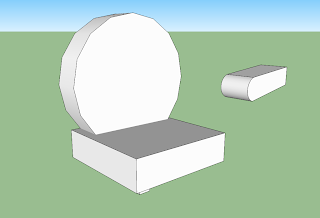
For a CyberArts assignment, we are designing chairs and creating miniature 3D models of them out of foam core. I designed a monster chair and below is an image of my first try modeling for 20 minutes on a software called SketchUp. It was a bit of a failed attempt; the software is a bit tricky trying to get all the shapes aligned. The back of my chair is curved and the curve on SketchUp didn't exactly fit the shape.

Monday, March 28, 2011

CyberArts Assignment: Romanticism

Lately, in CyberArts, we've been studying Romanticism, an art form that existed in the second half of the 18th century. It was prominently in Europe and emphasized drama and emotion in artworks. It focused on high contrast, composition, line, the majesty of untamed nature, emotions like horror, terror, and awe, and mythologies. The assignment was to create either a collage or a dry-point print (etching on a sheet of plexiglass, filling it with water-soluble ink, then pressing it on paper with a printing press), and make it have a Romanticism theme. I chose to do a dry-point print that focused on the majesty of nature and how small humans are in comparison.


The process work took a while because I was striving to make it look realistic and that was difficult to do in regards to line drawing. The composition I chose was diagonal because I wanted the viewer's eyes to be directed to where the tiny human in the artwork's eyes are looking towards. The final piece shows a small man standing on a bunch of rocks overlooking a lake surrounded by forest and mountains. The biggest problem I had (this affected my prints) was that there was so much detail that I didn't press hard enough in some areas. This caused the ink to rub off too much in some parts of the artwork and made it look a bit odd. The first print I did didn't turn out too bad. The second print I tried in colour, and the ink did not stick. The black ink transfered onto the paper but the blue I used for the sky and the green I used for the forest did not. The third print I did turned out not bad except parts were still hard to see. I used black and grey instead of colour.

Sunday, March 6, 2011

Blog Post #3: Video on Trial: The Good, the Bad, and the Outrageously Hilarious Music Videos

Greetings, fellow music video critics!

Have any of you watched or heard of Video on Trail? No? It's a program that critiques music videos; whether they suck, whether they rock, things like that. Today I'll be critiquing 3 music videos (the assignment was to do 2, but the 3rd one I found was too good to pass up). The first one features the song You Spin Me Round by Dead or Alive.This first video I consider to be quite bad. Unfortunately, the music video contains content from Sony Music Entertainment so you'll have to watch it on Youtube since it won't let me upload it to my computer.

Click Here For You Spin Me Round

This music video was made in the 80s (this could count for part of the reason why it is so weird and crazy). The main singer is dancing in a lumpy purple robe and gold scarf in half the video, and an all-black outfit complete with eyepatch the other half. His hair looks like he's been electrocuted on one side, and in part of the video he has 6 arms. All in all, a very strange music video that doesn't really pertain to the song except for the part where people are being tied up as they spin around. The song I like, the video, I do not.

This next video features the song Lollipop by Mika. This one is my favourite. For some strange reason, none of the videos uploaded properly so you'll have to click on the links if you want to see the videos.

Click Here For Lollipop

Lollipop by Mika was released in 2007, and it's one of my favourite music videos- it's animated, the animations are colourful and smooth, and the video makes sense when you hear the song. Sometimes I get bored watching live action music videos all the time so this was a refreshing change.

The third video is an outrageously crazy video. The song is Safety Dance by Men Without Hats and every time I see it I laugh really hard.

Click Here For Safety Dance

I think this video is honestly, totally crazy. I don't know why there are chicken masks, giant S's, and a midget playing a lute. This video is meant for laughs, in my opinion. I don't even get why it's called Safety Dance, and it seems the guy singing in the video kind of wanders around a bit in parts of the video.

Blog Post #2: MAGIX Movie Edit Pro Plus 17

Greetings, all promising movie editors!

Just recently in CyberArts everyone was assigned to re-cut a movie/ video game trailer using sounds and music to change its genre using iMovie. iMovie seemed to limit my creativity too much so I hunted around and discovered a new movie editing software- MAGIX Movie Edit Pro Plus 17! It used to be an audio-editing only software, but recent versions have expanded it to video as well. It's not a very expensive software either, compared to others: $100. Here's a screenshot of the software in action (I found it uploaded on the website among others):


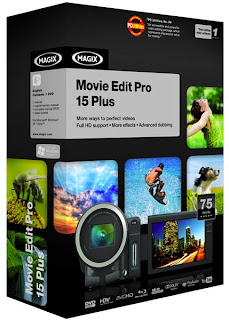
And here's a picture of what the package looks like if you want to buy it:


The thing I like best about this software is how much freedom you have with it. You can mess around with the sounds, fades, and video to your heart's content and it's not even that difficult to learn. The things I needed to know to make the Oliver Twisted trailer I found in the manual and in the Help section on the software itself. It's a software I would highly recommend for promising movie and sound editors.

Saturday, March 5, 2011

Blog Log (2011)

Inspired by fellow CyberArtist NightAngel, I've decided to post a Blog Log too (mostly due to my bad memory).

Tips & Tricks- 4/6

Personal Inspiration- 2/6

Artistic Inspiration- 4/6

Wild Card- 5/6

#1- Oliver Twisted recut trailer (Wild Card)
#2- MAGIX Movie Edit Pro Plus 17 (Tips and Tricks)
#3- Video on Trial (Wild Card)
#4- ZBrush (Tips and Tricks)
#5- Cinematographer (Artistic Inspiration)
#6- Don Martin (Personal Inspiration)
#7- Bobby Chiu(Artistic Inspiration)
#8- Sean Galloway(Artistic Inspiration)
#9- Cool Sidewalk Art ( Personal Inspiration)
#10- Graffiti Tutorial (Tips and Tricks)
#11- Will It Blend (Wild Card)
#12- Wacom Tablets (Tips and Tricks)
#13-Shazaam! Project (Wild CArd)
#14-Edward Burynsky (Artistic Inspiration)
#15-Tech Class Photo Shoot (Wild Card)

Wednesday, March 2, 2011

CyberArts Assignment: Big and Little Paintings

Greetings readers,

Not to long ago in CyberArts, a very interesting project was afoot. The project started with four giant pastels, then they turned into tiny croppings; these croppings became large pastels of the croppings. These large pastels then became large paintings, then the large paintings became small paintings. Below are photos of the large painting and small painting that I did:


Here is the large painting; as you can see, the goal was to be loose and crazy. Not much attention to detail here, but I feel that it turned out pretty good. It was interesting to not worry if you didn't paint it exactly to scale and to use large, flowing brushstrokes. A problem I had to overcome during this was covering up a spot of grey paint that somehow got onto the orange section. Four or five layers had to be applied before it was covered up. Another major problem was the tape border; it kept peeling off the board and brown paint managed to worm its way under it to ruin the border. Other than that, the large painting is probably my favourite because it was so much fun to paint. I would say the best section of that painting is the pink section at the bottom; the way the pink and white are layered on top provide good contrast. The area I would do over again if I could would be the brown section because it seems to lightly painted on compared with the rest of the painting.


This is the smaller painting; the goal here was to incorporate more details and to concentrate on getting smaller and more accurate brushstrokes. The smaller painting required more concentration because if a darker colour accidentally got into an area of the canvas with a lighter colour, multiple layers had to be applied in order to cover up any mistakes. Again, more gray spots appeared on this one and I had to apply more layers. A difficult part of this painting was adding light and dark to it. The original cropping was all one dull tone. I again enjoyed painting the pink section at the bottom because I could vary my brushstrokes more with pink and white. It doesn't look as good as the larger version in my opinion but I feel I did a pretty good job. The hardest part was painting the green. On paper, the green paint went on smoothly; on canvas, it went bumpy and jagged. The brush didn't flow as much on canvas and the result was jittery lines in areas.

Wednesday, February 23, 2011

Blog Post #1: Re-Create a Movie Trailer: Oliver Twisted

Greetings, readers!

In CyberArts Tech our assignment was to take an existing movie or video game trailer and edit it using sound effects and music. I chose Oliver Twist, released in 2005 and directed by Roman Polanski. Instead of just using the clips from the movie trailer, I decided to go crazy and used clips from the entire movie! My goal was to change Oliver Twist from a drama to a horror. Here's a compare and contrast from the original trailer:


And here's the NEW version:


In order to maximize the creepiness and make Oliver Twist look like a psycho, I combed through the whole movie and cut out the creepy bits using MAGIX Movie Edit Pro Plus 17 (editing software). Once I'd done that, I re-arranged all the clips in different orders, trying to get an underlying story for the trailer. When I was satisfied with how the trailer clips were, I edited the sound (that took quite a while since I had to make sure all the sounds faded together nicely). Then I added in the sound effects; some were already in the movie and others I had to record myself. In the end, I think the trailer turned out pretty spooky.

Friday, February 4, 2011

About Myself

Hey everybody

I'm Jennifer E. and I love to draw (that's my main reason for joining CyberArts). I carry a sketchbook with me so I can scribble things down if I happen to spot something interesting in the daily goings on. I also enjoy working in Photoshop and Illustrator (second reason). My goal is to become a computer programmer (and also for video games), an animator, and an excellent Photoshop painter. If we could do lots of drawing in Photoshop, learning how to paint your drawings in Photoshop, using effects to make your drawing seem more realistic (things like that), that would be awesome. I like to swim, play badminton, and bike (stationary and otherwise). My favourite foods include: nachos, lasagna, and Mr. Noodles. I dislike: pickles, politicians, annoying people, eggs, cake, donuts (doughnuts), lobster, veal, the colour pink, live action movies that feature talking animals (the CGI is annoying), and selfish drivers. I'm going to try my best this year so I can get good grades and learn a lot (yadda yadda yadda) and I'd say a lot more things about myself but I'm gonna cut it off here.

Thanks for reading this and have a nice day.